This tutorial describes how to build a conveniently
organized shopping catalog that organizes your products by categories. It allows you to create a hierarchal product
catalog with an unlimited number of levels and an unlimited number of
categories within each level. Product
Items can be placed in multiple categories.
E.g. you may want to place “King Louis XIV Armoire” in both the “Armoires”
and “King Louis XIV Furniture” categories.
Portal Prodigy provides a number of different options that
allow you to customize the style and layout of each category. Differentiating your categories keeps your
catalog interesting.
Pre-requisite: The feature Enable Advanced Product Catalog
must be set to Yes in the Product
& Inventory Features Management page in order to access the Product Catalog
Management features.
- From the Site Administration Menu
 option, click
  to display the Product Catalog
Management page.
to display the Product Catalog
Management page.
- The Catalog automatically contains the
following pre-defined categories:
- Products Catalog – this is the top level of your product
catalog. All categories and levels
you add are inserted below this category.
- Found Products – this is a special category used by the
Search For Products Feature. It
allows you to configure the Search For Products results page. Do not insert categories below this
special category.
- Comparable Found Products – this is a special category used
by the Search for Comparable Products Feature. It allows you to configure the Search
for Comparable Products results page.
It is only shown when the Comparable Products feature is enabled. Do not insert categories below this
special category.
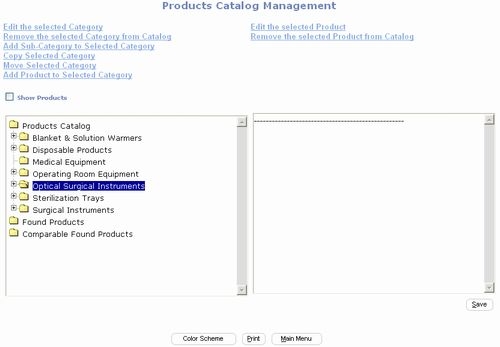
- Highlight Products Catalog as shown
below.

- Click Add
Sub-Category to Selected Category option. This will display the Products Category
Management page displayed below.
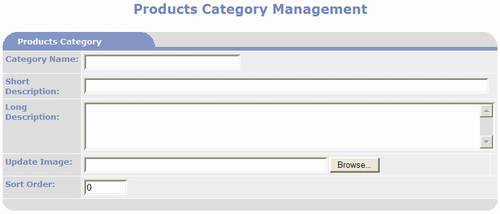
- There are three parts to configuring a
Category:
- Part 1 – describe the
category.
- Part 2 – configure how
products are to be displayed within the category.
- Part 3 – configure how sub
categories are to be displayed within the category.
Part 1- Describe the Category:
- Enter the Category Name that you want
displayed as the page title for this category. This is also the name that is shown in
category listings.
- Enter a Short Description of the
category. This must be no more than
255 characters. The Short
Description can be displayed below the Category Name on category listings.
- Enter a Long Description to be
displayed at the top of the Category page.
- If you want to display a picture along
with the description at the top of the Category page use the
 button to open the Choose File window and
select either a JPG or GIF image from your computer.
button to open the Choose File window and
select either a JPG or GIF image from your computer.
- Enter a number corresponding to the
order position you want this category to be listed in your catalog. Leave as 0 to sort display alphabetically.
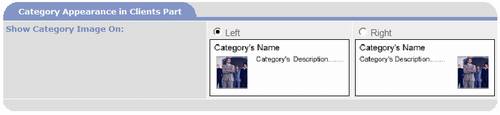
- Select whether you want the Category
Image loaded on the right side or left side as shown below:
Part 2 – configure how products are to be displayed
within the category
- If the Category is to include
Products, the following section is used to configure how the products are
displayed and what information is shown.
If the Category will only display Sub-Categories, then skip this section
and go to Part 3.
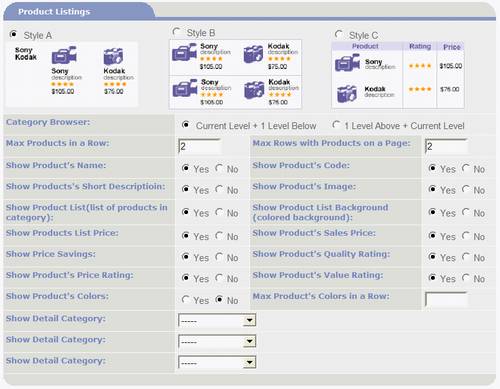
- Select one of the three styles
defining the layout.
- Select which method to use for Category
Browser.
- Enter Integer values in Max Products
Row and Max Rows with Products on a Page fields to define the number of
products displayed on the page.
- Answer Yes or No to each question to show or not show it on the page.
- You can display up to three Detail
Categories on the Catalog page.
These are values that you define using Detail Category Management. Detail Categories are displayed on the
Product Detail page, but you can also include them on the Category
page. Select a Detail Category from
list box to include, otherwise leave as is.
Part 3 – configure how sub categories
are to be displayed within the category:
- If the Category contains
Sub-Categories configure how they are displayed here.
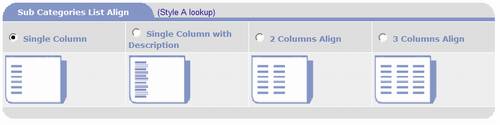
- Select from one of the four
choices. The second choice
includes the Short Description below the Category Name.
§
Click  option button located at the bottom of the
Products Category Management page and confirm save.
option button located at the bottom of the
Products Category Management page and confirm save.
§
The Category is now a part of your Product
Catalog and ready to have products assigned to it. PORTALPRODIGY will return to
the Product Catalog Management page.


