 The Site Settings
Management page is used to configure default page settings for your
website.
The Site Settings
Management page is used to configure default page settings for your
website.
If you have been using PortalProdigy
prior to the addition of Page Management and THTML, note that the settings from
Logo & Title Management page along with some of the settings from About Us
Management page have been moved to Site Settings Management.
Settings Collection section:

- Name –
lists names of Site Setting Collections.
Your new site will default to the collection “[Default Site Config]”. To create a new Site Settings
Collection, click the
 button.
You may create as many Site Setting Collections as you like. E.g. you may want to create different
settings for “Christmas”, “Easter”, “Independence Day”, “Halloween”, “Winter”,
“Spring”, “Summer”, “Fall”, etc. When the Site Settings Management page
is first opened, it displays the Site Settings Collection that it is set
as the Active Site Settings. To retrieve
an existing Site Settings Collection, select it from the drop down list
box. Selecting a different collection will refresh the page, displaying
the settings for the selected collection.
button.
You may create as many Site Setting Collections as you like. E.g. you may want to create different
settings for “Christmas”, “Easter”, “Independence Day”, “Halloween”, “Winter”,
“Spring”, “Summer”, “Fall”, etc. When the Site Settings Management page
is first opened, it displays the Site Settings Collection that it is set
as the Active Site Settings. To retrieve
an existing Site Settings Collection, select it from the drop down list
box. Selecting a different collection will refresh the page, displaying
the settings for the selected collection.
- Use as Active
Site Settings – set to “Yes” to make the selected Site Settings Collection
the active Site Settings for the site.
This will apply the selected Site Settings Collection to your
website. All pages that are
configured to inherit from Site Settings shall inherit the active Site
Settings Collection.
Selected Settings
section:
This section is used to configure the Site Settings
Collection.
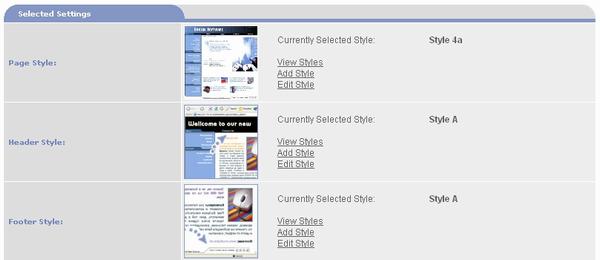
§
Page
Style – determines the general page layout and design. A thumbnail of the selected Page style is
displayed along with its name and the options View
Styles, Edit Style,
and Add Style. Use View
Styles to select a Style. It
opens the Style Selection page which displays the available Page Styles. PortalProdigy ships with a variety of
Standard Styles for you to choose from, plus you can create your own Custom
Styles. See the Style Selection section
of this chapter for a detailed explanation how to use the Style Selection
page. Edit
Style opens the selected style in Style Manager. Using Style Manager you can view and edit the
style’s code. See the Style Manger
section of this chapter for a detailed explanation of how to use the Style
Manager. Add Style opens the Style Manager in add new mode so you can
upload a new Custom Style. When you
select a different Page Style, the Header and Footer Styles are automatically
synchronized to match the selected Page Style.
§
Header
Style – determines the design and layout of the Header. Displays a thumbnail of the selected Header
style along with the options View Styles,
Edit Style, and Add Style.
These options work the same as for Page Style. Use View Styles to select a Header Style.
§
Footer
Style – determines the design and layout of the Footer. Displays a thumbnail of the selected Footer
style along with the options View Styles,
Edit Style, and Add Style options. These options work the same as for Page
Style. Use View Styles to select
a Footer Style.
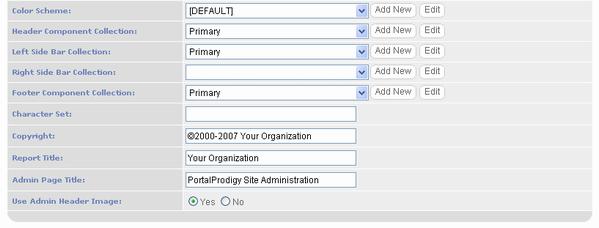
§
Color
Scheme – Use the list box to select a Color Scheme Collection. Color Schemes allow you to manage the colors
used on your website. The  button is used to create a new Color Scheme
Collection. The
button is used to create a new Color Scheme
Collection. The  button is used to edit the selected Color
Scheme Collection. See the Color Manager
section of this Chapter for a detailed explanation of the Color Manager
page.
button is used to edit the selected Color
Scheme Collection. See the Color Manager
section of this Chapter for a detailed explanation of the Color Manager
page.
§
Header Collection
– use the list box to select a Header Collection. Header Collections allow you to manage the
components displayed in the page header.
Components include menus, search option, login option, etc. The button is used to create a new Header
Collection. The button is used to edit the selected Header
Collection. See the Header Collection
Manager section of this Chapter for a detailed explanation of the Header
Collection Manager page.
§
Left Side
Bar Collection – if the Page Style you have selected contains a left side
bar, use this list box to select a Left Side Bar Collection. Left Side Bar Collections allow you to manage
the components displayed in the left side bar of the page. Components include menus, promotion inserts,
event inserts, news inserts, etc. The button is used to create a new Left Side Bar
Collection. The button is used to edit the selected Left Side
Bar Collection. See the Side Bar
Collection Manager section of this Chapter for a detailed explanation of the
Side Bar Collection Manager page.
§
Right
Side Bar Collection – if the Page Style you have selected contains a right
side bar, use this list box to select a Right Side Bar Collection. Right Side Bar Collections allow you to
manage the components displayed in the right side bar of the page. Components include menus, promotion inserts,
event inserts, news inserts, etc. The button is used to create a new Right Side Bar
Collection. The button is used to edit the selected Right Side
Bar Collection. See the Side Bar
Collection Manager section of this Chapter for a detailed explanation of the
Side Bar Collection Manager page.
§
Footer
Collection – use the list box to select a Footer Collection. Footer Collections allow you to manage the
components displayed in the page footer.
Components include menus, search option, login option, etc. The button is used to create a new Header Collection. The button is used to edit the selected Header
Collection. See the Header Collection
Manager section of this Chapter for a detailed explanation of the Header Collection
Manager page.
§
Character
Set – use to change the character set for your website’s web pages. The default value is “windows-1256” which is
the standard character set for the English language. .
§
Copyright
– enter your copyright notice here.
Standard Templates display the copyright notice in the footer of all
pages.
§
Report
Title – this is the title that is displayed on your reports. Typically enter your Company Name here.
§
Admin
Page Title – this is the Page Title that is displayed on your
Administrative pages. .
§
Use Admin
Header Image – set to “Yes” to display the admin mascot on the Site Administration
Main Menu. In the near future we plan to
offer a feature to load your own mascot. This is feature is just for fun. Live
the Life!. Set to “No” to disable the
mascot on the Site Administration Main Menu.
Organization section:
§
Title 1
– use to enter your Organization’s title (name). If you selected Header Style A, the value
text you enter here for Title 1 will be displayed in your header. Other Header Styles may not include Title 1.
§
Title 2
– use to enter a text value for your Organization’s sub-title. If you selected Header Style A, the text you
enter here for Title 2 will be displayed in your header. Other Header Styles may not include Title 2.
§
Append
Organization Title – use to upload an image for your Organization’s title
in lieu of using the text entries Title 1 and Title 2. The  button opens a dialog box to select and upload
an image file. It supports GIF, JPG and
SWF (Shockwave/Flash) files. If you
selected Header Style B, the image you upload here will be displayed in your
header. Other Header Styles may not
include the Organization Title image.
button opens a dialog box to select and upload
an image file. It supports GIF, JPG and
SWF (Shockwave/Flash) files. If you
selected Header Style B, the image you upload here will be displayed in your
header. Other Header Styles may not
include the Organization Title image.
§
 Manage Global Values option – use to open
Global Custom Value Management. If you
want to include your organization’s Logo in the header section of your website,
this is where you load it. Be sure to
select Header Style A which includes the logo image. Note that other Header Styles may not include
it. Other than your logo, Global Custom
Value Management is used to manage custom values that you define in template
styles. E.g. if you have a specific
phone number for your Help Desk, rather than placing the number in your
template styles, you can place a variable tag where you want the number
displayed and PortalProdigy will automatically replace the tag with the
number. The advantage is that when the
number needs to be changed you can change it once in Global Custom Value
Management and it will automatically be replaced throughout your website. Global Custom Value are especially useful for
values that frequently change. See the
chapter of this guide titled Utilities, it contains a Global Custom Value
Management section that provides additional information.
Manage Global Values option – use to open
Global Custom Value Management. If you
want to include your organization’s Logo in the header section of your website,
this is where you load it. Be sure to
select Header Style A which includes the logo image. Note that other Header Styles may not include
it. Other than your logo, Global Custom
Value Management is used to manage custom values that you define in template
styles. E.g. if you have a specific
phone number for your Help Desk, rather than placing the number in your
template styles, you can place a variable tag where you want the number
displayed and PortalProdigy will automatically replace the tag with the
number. The advantage is that when the
number needs to be changed you can change it once in Global Custom Value
Management and it will automatically be replaced throughout your website. Global Custom Value are especially useful for
values that frequently change. See the
chapter of this guide titled Utilities, it contains a Global Custom Value
Management section that provides additional information.
§
Use
Title? – ignore this field as it is no longer used and will be removed in a
future version.
§
Address 1
– use to enter the first line of your organization’s mailing address.
§
Address 2
– if needed, use to enter a second line for your organization’s mailing
address.
§
City
– use to enter the City for your organization’s mailing address.
§
Country
– use to enter the Country for your organization’s mailing address.
§
State /
Province – use to select the State or Province for your organization’s
mailing address. For the USA,
Canada, Mexico
a list box of the States or Provinces is displayed to select from. For all other countries a text box is
displayed and you must enter the value.
§
Zip /
Postal Code – use to enter the Zip or Postal Code for your organization’s
mailing address.
§
Phone
– use to enter your organization phone number that you want displayed on your
website.
§
FAX –
use to enter your organizations FAX number that you want displayed on your website.
§
Email
– use to enter your organizations Email address that you want displayed on your
website.
The address information entered above creates default values
for the User Signup options, Contact US
information, and Order Information.
Search Engine Settings
section:
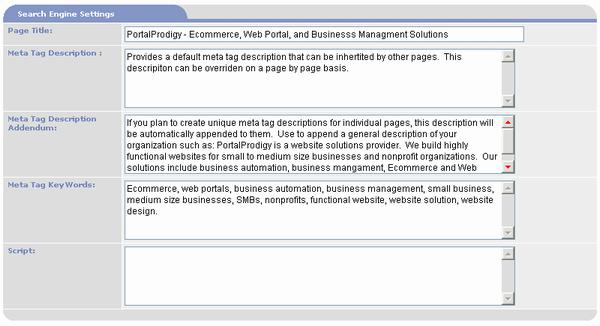
§
Page
Title – use to enter a default Page Title.
The Page Title is displayed in the browsers title bar. This value can be overridden on a page by
page basis. Page Titles play an important role in indexing and page ranking by
search engines.
§
Meta Tag Description – use to enter a
default Meta Description to be inserted into your web pages. Meta Descriptions are used by search engines
to index and rank web pages. They are
not visible to the user.
§
Meta Tag Description Addendum – use to
enter a generic addendum that will be added to the Meta Descriptions defined
for each page. This is typically used
when you will be defining page specific Meta Descriptions and you want to
append a general description of your Organization to them.
§
Meta Tag Keywords – use to enter default Meta
Keywords that will be inserted into your web pages. Meta Keywords are used by search engines to
index and rank web pages. They are not
visible to the user.
§
Script
– use to enter script that will be inserted into your web pages. This can be a combination of HTML and Java
Script. This is typically used to enter
scripts for tracking purposes such as ad word tracking, traffic analysis, etc.
Option buttons:
|

|
Saves the Site Settings Collection.
|
|

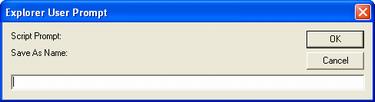
|
Save the Site Settings as a new collection. Prompts to enter a Site Settings Collection
Name as follows:
|
|

|
Deletes the Site Settings Collection.
|
|

|
Prints the page to the user’s local printer.
|
|

|
Displays an example page using the Site Settings Collection.
|
|

|
Closes the page without saving or updating values.
|
|

|
Closes the page and prompts to save the data.
|


