The Administration Company Management page is reached by
clicking the “Companies” Browse button located in the Contact Management menu
of the Main Administration Menu (Ctrl-Alt-m).
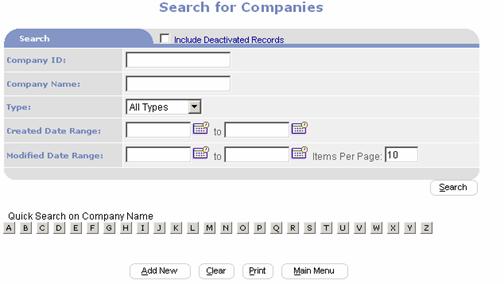
The Search for Companies page provides several filters by
which to search for company(ies) record(s). Enter characters into one or more
fields and then click on the Search button to locate records.
The resulting set of matching records is listed in a table
below the search entry form.
Clicking on an ID links into the corresponding record.
Using the Quick Search tool, the user can locate records by
clicking on a letter.
The Administration Contact Management page can also be
reached by clicking the “Companies” Add button located in the Contact Management menu
of the Main Administration Menu (Ctrl-Alt-m). In which case a blank Add New
Company page is presented.
The Company Management Page provides access to the different
components of the Company Management System via clickable tabs. Upon clicking a
tab, the system refreshes the page to present the corresponding search, add or
report interface. From the Company Management Interface one can access the
following types of records: Company contact information, employees, Requests
for Quotes, Quotes, Orders Memberships, mailing address, billing address,
shipping address and commentary.
Actions that can be
performed from Contact Management include:
View and update contact information.
Delete companies.
View and update company information.
View and update employee information.
Add and Edit RFQs
Price RFQs and convert to Quotes
Convert Quotes to Orders
View Orders
Add and Edit Orders
View a company’s memberships and subscriptions
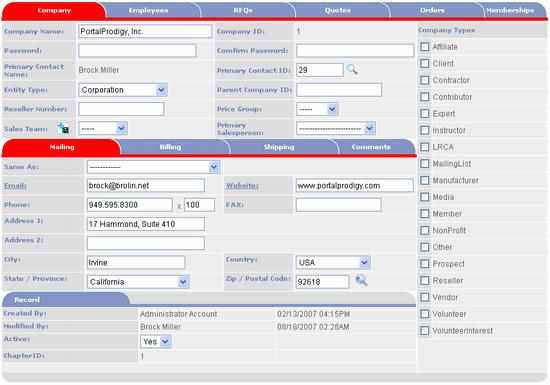
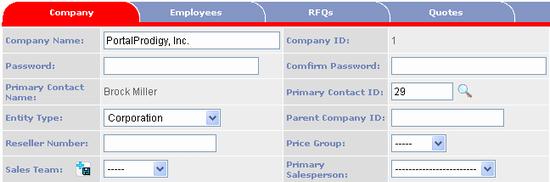
Company tab:
Company Name –
Enter the name of the organization.This can be the legal name or the common name used for the
organization, e.g. “International Business Machines, Inc” vs. “IBM”.A value is required.
Company ID - Each
Company Record is assigned a unique numerical identification number
automatically.
Password - Data
entered into the Company Password field becomes the password into certain
functions related to the Company. For example, certain items may be
purchases by a logged in user and billed to their company provided they
submit the correct company password.
Confirm
Password - The Password field is encrypted so it may not be reviewed
visually to confirm accuracy. Therefore, a second field requires that the
password be typed again for confirmation of accuracy.
Primary
Contact – Indicates your organization’s primary contact at the company.
Primary
Contact ID – Use the lookup icon to locate a new primary contact
record or to add one.
Entity Type
– Unlike many of the selection lists used in PORTALPRODIGY, the Entity
Type selections are hard coded and may not be customized because the selections
are used by the logic of certain business processes preprogrammed into the
application. Either “Corporation”, “Government Agency”, “Nonprofit
(501(c)(3))”, “Partnership”, or“Sole Proprietorship” may be selected.
Reseller
Number – In many cases, you may not charge your resellers Sales Tax as
they are exempt. If the Company of Record is a reseller of your products,
it may have a state or other government issued Tax ID which you’ll need to
record for your tax records.
Price Group
– this list box field is used to select a special pricing group for the
customer.Price Groups are used to
create specific Product Item pricing for select groups of customers.E.g. “Wholesale”, “Retail”, “Members”,
etc.Price Groups are created and
maintained using
Sales Team
- The ‘Sales Team’ are members of the sales staff, typically your
employees. This field is used to indicate the team responsible for the
selling process.The selections are
customizable and usually set up by the administrator before engaging the
Opportunity Management system. Sales Team selections may be added or
updated by an authorized administrator at the Sales and Opportunity
Features Management page. (Ctrl-Alt-m => Site Management/Features =>
Sales & Opportunity => Sales Team)
Primary Salesperson
- When contact records for your sales staff are created in PORTALPRODIGY,
the “Sales Team” Contact Type box should be selected. If it is selected
and Sales Teams have been created in Sales & Opportunity Feature
Management, then Sales Team roles will be assignable under the security
tab of the contact record. When a Sales Team is selected in the prior
Sales Team Selection Entry Field, all contacts with roles on the selected
team are made available in the Primary Salesperson Selection Entry Field.
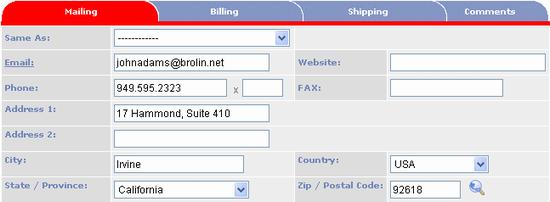
Company - Mailing Sub Tab:
Same
As - The Mailing Address Fields can be quick-filled by selecting the Same As option or they can be typed
in manually.
Email
Address – Used to indicate the mailing contact’s email address
Website
Entry – Used to indicate the mailing contact’s website address.
Phone
Entry – Used to indicate the mailing contact’s Phone Number
Phone
Extension - Used to indicate the mailing contact’s Phone Extension Number
FAX
Entry - Used to indicate the mailing contact’s Fax Phone Number
Address
1 – Used to indicate the company’s mailing Street Address
Address
2 – Used to indicate the company’s additional mailing address
information such as apartment or suite.
City
Entry – Used to indicate the company’s mailing City
Country
– Used to indicate the company’s mailing Country. Note: The selections in
this field are limited to the countries activated in Countries Management.
To update the Country Selection List click on the features icon
located on the Site Management menu column of the Main Administration Menu
(Ctrl-Alt-m). Then click on the UserSignUp button the click on the Countries link
Company’s
State or Province - The State or Province selections available are
based on the Country field selection.
Zip
/ Postal Code – Used to indicate the company’s mailing Postal Code
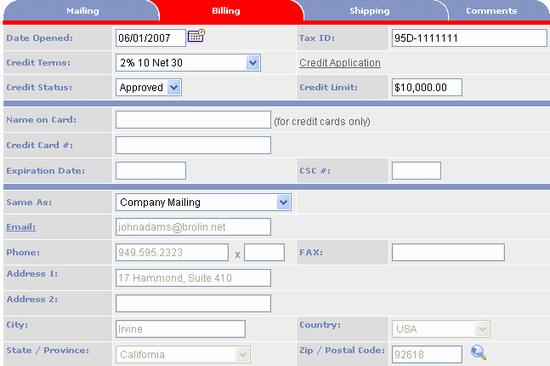
Company - Billing sub-tab:
Date
Opened - This date is auto-filled to the date that Credit Status is
set to approved, when approval
is made using the credit application approval process or it may be filled
in manually.
Credit
Terms - Used to assign credit terms to a company.Terms selections such as Net 10, Net 30, etc. are defined in Features Management. To edit
selection list, click on edit button located in Site Management
menu column of Main Administration page (Ctrl-Alt-m). Then click on Companieslink then Click on Terms link.
Credit
Application – The Credit Application
link initiates the Credit Application Management page which provides an
application approval process that can be used to verify credit, rate
credit history, enter administrative comments, set credit terms and set a
credit limit. (See the chapter titled, Credit Applications Features in
Detail of the Administration Manual for details)
Credit
Status - Provides three possible selections; Approved, Declined and
Pending. Affects certain logical
decisions in features that involve ordering, purchasing, invoicing and payments.
For example, companies with approved
credit status may be permitted to place orders and pay by mail while those
with declined credit status may
be required to submit credit card information before an order is accepted
or processed.
Credit
Limit - Certain features involvingordering, purchasing, invoicing and payments verify that the company
does not have outstanding accounts receivable beyond the credit limit
before processing orders. Companies that exceed their credit limit may be
required to submit credit card information before an order is accepted or
processed.
Credit
Card Information – Credit card data may be
entered here and it will auto-fill when the company makes purchases using
the PortalProdigy payment features OR the fields on this page will
auto-fill with information the visitor inputs during an online purchase
process.
Name on Card - Always enter the
exact name as it is displayed on the customer’s credit card.
Credit
Card Number - input for credit card number.
Expiration
Date - input for credit card expiration date.
CSC
Number - input for credit card security code.
Billing
Address Information – the Billing Address
Fields can be quick-filled by selecting the Same As option or they can be typed in manually.
Email
– Used to indicate the billing contact’s email address.
Phone
– Used to indicate the billing contact’s phone number.
Phone
Extension - Used to indicate the billing contact’s phone extension number.
FAX
- Used to indicate the billing contact’s fax phone number.
Address
1 – Used to indicate the company’s Billing Street Address
Address
2 – Used to indicate the company’s additional billing address
information such as building or suite.
City
– Used to indicate the company’s BillingCity
Country
– Used to indicate the company’s Shipping Country.Note: The selections in this field are
limited to the countries activated in Countries Management. To update the
Country Selection List click on the features icon
located on the Site Management menu column of the Main Administration Menu
(Ctrl-Alt-m). Then click on the UserSignUp button the click on the Countries link
State
or Province – Used to indicate the company’s BillingState or Province. The State
or Province selections available are based on the Country field selection.
Zip
/ Postal Code – Used to indicate the company’s Billing Postal Code
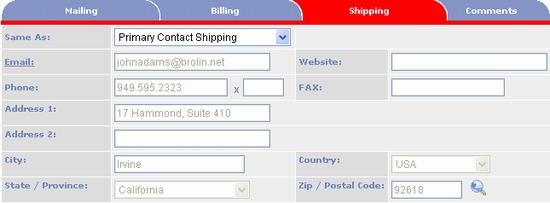
Company - Shipping sub-tab:
Same
As - The Shipping Address Fields can be quick-filled by selecting the Same As option or they can be typed
in manually.
Email
Address – Used to indicate the shipping contact’s email address
Website
– Used to indicate the shipping contact’s website address.
Phone
– Used to indicate the shipping contact’s Phone Number
Phone
Extension - Used to indicate the shipping contact’s Phone Extension
Number
FAX
- Used to indicate the shipping contact’s Fax Phone Number
Address
1 – Used to indicate the company’s shipping street address.
Address
2 – Used to indicate the company’s additional shipping address
information such as building or suite.
City
– Used to indicate the company’s shipping city.
Country
– Used to indicate the company’s shipping country.Note: The selections in this field are
limited to the countries activated in Countries Management. To update the
Country Selection List click on the features icon
located on the Site Management menu column of the Main Administration Menu
(Ctrl-Alt-m). Then click on the UserSignUp button the click on the Countries link
State
or Province – Used to indicate the company’s ShippingState or Province. The State
or Province selections available are based on the Country field selection.
Zip
/ Postal Code – Used to indicate the company’s shipping postal code.
Company - Comments sub-tab:
Comments
Field – this field may be used to enter any form of comments or
additional information about the organization.Note that this field is not searchable.
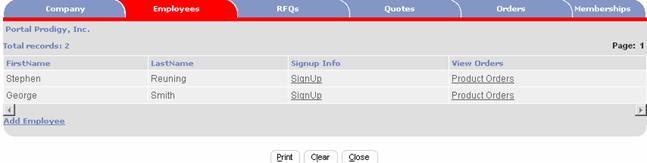
Employees tab:
The Company Management Employees Tab Page lists all contacts
that are linked to the company record.
SignUp Link –
Accesses corresponding employee’s Contact Record where it may be viewed
and updated.
Product Orders link
– Accesses corresponding employee’s Orders Search page.
Add Employees Link
– Accesses the Add a Contact page permitting user to add new contact
records for additional employees.
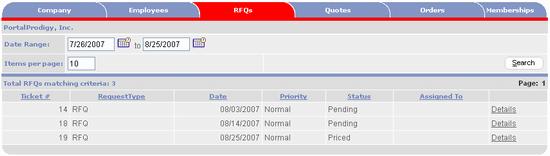
RFQs tab:
DateRange
– Enter a date range to search for RFQ records created within the entered
range.
Details Link –
Clicking on the Details link accesses the Request Management page for the
corresponding RFQ.
Quotes tab:
DateRange
– Enter a date range to search for Quote records created within the entered
range.
Place Order Link – Accesses
form to convert quote into an Order
View Link – Clicking
on View link accesses the corresponding Order Receipt.
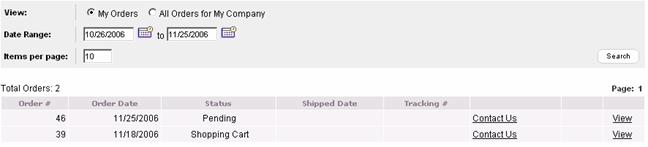
Orders tab:
DateRange
– Enter a date range to search for Order records created within the entered
range.
Copy as New Order Link
– This link is used when customers reorder. It clones the Order.
View Link – Clicking
on View link accesses the corresponding Order Receipt.
Memberships tab:
DateRange
– Enter a date range to search for Membership records created within the entered
range.
Options Link – Clicking
on the Options link accesses the Membership Options page for the corresponding
membership where Membership information may be reviewed and payments made.