From the Site Administration Menu:
§
Click on the Order  button (located in the Transaction Mgmt.
section).
button (located in the Transaction Mgmt.
section).
§
This displays the Create Orders >> Select
Contact page.
§
You have two options:
o
Enter search criteria to search for an existing
contact. Note that when the system finds
a single match, it automatically selects it for you.
o
Click on the
 button to create a new contact record. See Contacts, Members, Vendors & Companies
Feature in Detail Chapter for further instructions.
button to create a new contact record. See Contacts, Members, Vendors & Companies
Feature in Detail Chapter for further instructions.
It is extremely
beneficial to always attempt to locate a customer’s existing contact record
whenever there is a possibility that one exists. Avoiding duplicate contact records offers
many benefits including easier tracking of customer transactions, more accurate
evaluation of marketing efforts and avoids duplicate mailings.
o
If the Order is for a company you will need to
assign a company record to the contact.
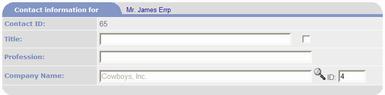
To assign a company to the contact, click on the  icon located to the right of the Company Name
field in Contact Management. This will
display the Search for Companies page which operates just like the Search for
Contacts page. You have two options:
icon located to the right of the Company Name
field in Contact Management. This will
display the Search for Companies page which operates just like the Search for
Contacts page. You have two options:
§
Enter search criteria to search for an existing
company.
§
Click on the
button to create a new company record. Click Close when finished and select Yes to
save changes.
o
Once you have saved or selected the Company,
PORTALPRODIGY returns to the Contact Management page and automatically fills in
the Company Name and Company ID.
§
The next step is to save the Contact
record. This returns you to the Order
and automatically inserts the Contact ID and Company ID in the Order record.
§
This displays the Order Management page in add
mode.
§
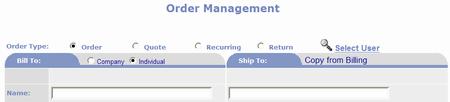
If Order is for an Individual, verify that the
Individual radio button (located to the right of Bill To: label) is
selected. If Order is for a Company,
click on the Company radio button.
§
Click on the  option to display the Search for Contacts
page.
option to display the Search for Contacts
page.
o
§
If the Order is set to For Company and the
contact you select does not have a company, the following message is displayed:
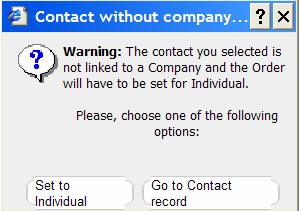
o
Click on Set to Individual to update the order
record for Individual.
o
Click on Go to Contact Record to assign the
individual to a company.
§
You have three options for entering the Bill To
and Ship To information:
o
Manually enter the data.
o
Click on Retrieve Home. This will copy the Contact’s Home Address,
Email and Phone number. You may change
the retrieved information.
o
Click on Retrieve Office. This will copy the Contact’s Office Address,
Email and Phone number. You may change
the retrieved information.
§
Select Terms from the drop down list.
§
If you select Pre-Paid for Terms, select a
Payment Type.
§
If you selected on account Terms such as Net 30,
you may enter a purchase order number into P.O. # field.
§
If you track sales by salesperson, enter the
salesperson’s ID or select a name from the drop down list.
§
You may change the Order Date.

§
You are now ready to add products to the
order. Click on Add Item. This displays the Search for Product Items
page
§
Using the Search for Product Items locate and
select an Item. This displays the Add
Item To Order Management page.
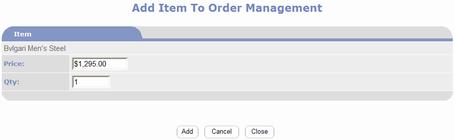
§
You may change the default price.
§
You may enter a different quantity. The default quantity is always one.
§
Click  button to add the Item to the Order. You may add additional Items by repeating the
above steps.
button to add the Item to the Order. You may add additional Items by repeating the
above steps.
§
Set the Shipping Options then click  button.
§
When finished with the data entry, Click  button.
This does two things:
button.
This does two things:
o
If you select Pre-Paid Terms, it displays the
Payment Entry page. Enter the payment
information and click  button to return to the Order Management page.
o
The status of the order is set to Pending,
inventory is committed, and GL Entries are made.
§
Depending on the settings in Features
Management, the Financial Status for the Order may be automatically updated
from the default value of Pending to Approved.
To enable fulfillment for the Order, the Order’s Financial Status must
be set to Approved. You may set it manually.
§
When finished, click  to exit.
If you made additional changes after clicking on Process, you will be
prompted to save the changes, otherwise it will just return to the Search for
Orders page without prompting to save.
to exit.
If you made additional changes after clicking on Process, you will be
prompted to save the changes, otherwise it will just return to the Search for
Orders page without prompting to save.


